Our team often has to start new projects from scratch, developing a full application including all of its services. Kubernetes is overkill at least in the early stages. We don't need an entire machine devoted to managing our running containers.
But we do containerize and we do use Docker. If you're not overly familiar with Docker, it's an immensely popular containerization tool that allows you to create isolated (containerized) repeatable versions of your servers that can run anywhere* and will always run the same. For example, you may create a Docker container for your Django web server. This would have many benefits including (but not limited to):
- Running the same on your computer as on anyone else's
- Being isolated and easily deletable and rebuildable
- Easily deployable as it will run the same in the cloud as well
- Can run with many other containers on the same hardware, efficiently sharing resources
But this is not a post about Docker. There's plenty of that on the internet with full tutorials and videos better than anything I could make on volumes, networks, builds etc.
Rather, this is about what comes after building your first Docker container. In the end it's not so useful to have just a Django web server. Usually an application or project consists of a lot more than that.
You might have a PostgresSQL server, a react app, an NGINX server, and that's just to get something basic going. That's where Docker Compose comes in.
Compose allows you to define all of your services under the framework of one project in the same clean and repeatable philosophy as Docker. Compose is not built for production applications. However, it is great for non-critical projects and dev environments as it's simple, lightweight and works for everyone. Later, it can be converted easily to either Kubernetes or Docker Swarm for production apps.
Once again, there's quite a bit (though definitively less than there is for Docker) on the internet to make a Docker Compose project, but this post is still about a step deeper - that is environments.
Problem Statement
We have a team of developers all working on the same project.
- They need to be able to doing the majority of their development locally on their machines with their own environments set up properly
- They need to be able to push the app to different staging environments once their contributions are ready for a secondary round of QA.
Solution + Implementation
For simplicity's sake, we will make a project with three services and two possible environments, development and staging:
1) A Django web server
2) A React app (run in dev mode when the environment is development)
3) An NGINX server (to serve the react app when the environment is staging)
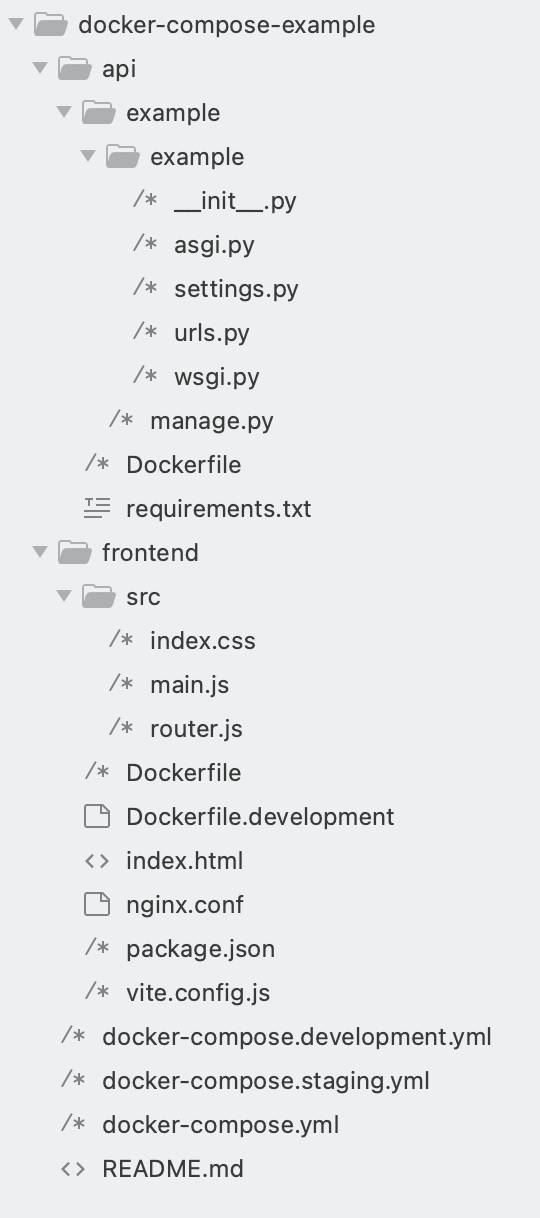
1 - Directory Structure
We can structure the project in a mono-repo, which will make it easy later to trigger CI/CD workflows in github to build the containers and push them out to remote staging and production environments.

2 - .env files
Docker allows by default the use of a .env file to specify environmental variables that can be passed into the docker compose environment and then cascade through the app. It's also possible to use a different .env file based on the command line call to docker-compose, so you could have different .env files such as .env.staging and .env.development. In our case we'll keep it simple with just one. This file should always be gitignored as it is always specific to the environment (ports may change for instance depending on working environment)
.env (example)
API_PORT=8000
REACT_PORT=5000
PROJECT_NAME=docker-compose-example
3 - Docker Compose Files
There are three docker compose files in the root of the directory. There are many ways to handle docker environments, but in this case we will have a base docker compose file and then two other docker compose files for each environment that will override the base file to start the project.
docker-compose.yml (base)
version: '3.8'
x-environment: &default-environment
  API_PORT: ${API_PORT}
  REACT_PORT: ${REACT_PORT}
  PROJECT_NAME: ${PROJECT_NAME}
services:
  frontend:
    build:
      context: ./frontend
      args:
        REACT_PORT: ${REACT_PORT}
    environment:
      <<: *default-environment
    ports:
      - "80:80"
    depends_on:
      - api
  api:
    build:
      context: ./api
    environment:
      <<: *default-environment
      ${API_PORT}: ${API_PORT}
      ${DJANGO_PORT}: ${API_PORT}
    ports:
      - "${API_PORT}:${API_PORT}"
docker-compose.staging.yml (empty since no necessary overrides to base)
version: '3.8'
services:
  frontend:
docker-compose.development.yml
services:
  frontend:
    build:
      context: ./frontend
      dockerfile: ./Dockerfile.development
    volumes:
      - ./frontend:/app
    ports: !override
      - "${REACT_PORT}:${REACT_PORT}"
    environment:
      - VITE_PORT=$REACT_PORT
    command: yarn dev
  api:
    volumes:
      - ./api:/app
The base compose file sets up two services, api and frontend which are the Django and React apps respectively.
The staging compose file is empty for now, we could fill it in later, but for now the base file is the same as the staging, so there is no need to override anything.
The development compose file accomplishes a few overrides:
- For the API, it mounts the code volume to the docker container, which ensures that changes made on the host server (locally) are reflected in real time in the docker container, allowing for the same dev workflow as if one was working only in a normal Django server.
- For the frontend, the override also mounts the code so that changes are reflected in real time, but also overrides the ports so that the react port specified in the .env is used, and yarn dev is run instead of the nginx server which is bypassed entirely.
4 - Frontend
The actual frontend react code is irrelevant to this example, but there a few files that are relevant.
Dockerfile
The base Dockerfile will be used in the staging environment. This builds the react app and then serves it via NGINX file (template config file below)
FROM node:18-alpine as build
WORKDIR /app
COPY package*.json ./
RUN yarn install
COPY . .
RUN yarn run build-staging
FROM nginx:alpine
COPY --from=build /app/dist /usr/share/nginx/html
COPY nginx.conf /etc/nginx/conf.d/default.conf
CMD ["nginx", "-g", "daemon off;"]
Dockerfile.development
The development Dockerfile will run in development mode and will bypass nginx to just run the react app in yarn dev mode on the port specified in the .env file above.
FROM node:18-alpine
WORKDIR /app
ARG REACT_PORT
ENV REACT_PORT=$REACT_PORT
ENV VITE_PORT=$REACT_PORT
COPY package*.json ./
RUN yarn install
COPY . .
EXPOSE $REACT_PORT
CMD ["yarn", "dev"]
nginx.conf
The NGINX file will be used by the nginx docker container to run the app.
server {
    listen 80;
    server_name localhost; # Change this to your domain if needed

    root /usr/share/nginx/html;
    index index.html;

    location / {
        try_files $uri $uri/ /index.html;
        add_header Cache-Control "public, max-age=1800, s-maxage=1800, must-revalidate";
    }

    location /static/ {
        expires 1y;
        add_header Cache-Control "public, max-age=31536000, immutable";
    }
}
package.json
This is a simplified package.json but it's important to pay attention to the scripts which can be called depending on the inherited environment. If vite knows the build mode, it is possible to specify vite .env.$environment files within the frontend directory that will be used for vite specific variables to get passed during build.
{
  "name": "docker-compose-example",
  "version": "1.0.0",
  "main": "index.js",
  "type": "module",
  "scripts": {
    "test": "vitest",
    "dev": "vite --host",
    "build": "vite build --mode production --emptyOutDir",
    "build-staging": "vite build --mode staging --emptyOutDir",
    "build-development": "vite build --mode development --emptyOutDir",
    "lint": "eslint . --ext js,jsx --report-unused-disable-directives --max-warnings 0",
    "preview": "vite preview"
  },
}
5 - API
Dockerfile
The API Dockerfile simply loads the requirements.txt and runs the Django server. Eventually, this should be behind Apache/NGINX in staging and follow a similar concept as the React app above.
FROM python:3.9
WORKDIR /app
COPY requirements.txt /app/
RUN pip install --upgrade pip
RUN pip install -r requirements.txt
COPY . /app/
EXPOSE $API_PORT
CMD ["python", "manage.py", "runserver", "0.0.0.0:$API_PORT"]
6 - Running it
Now two simple commands can run the app in either environment.
Staging
docker compose --env-file .env -f docker-compose.yml -f docker-compose.staging.yml up -d
Development
docker compose --env-file .env -f docker-compose.yml -f docker-compose.development.yml up -d
The .env file can be specified as seen here. The -f will use that docker compose file and override in order. You can imagine making a shell script to run these two commands depending on environment and making it even easier for a new dev to get up in the environment.
